You are here: Benchmark Home » DIY

Tag: DIY

DIY Self-Draining Bath Toy Storage

Bath-Toy-Organizer(featured)

If you have a small child (or small children), you probably have “too many” bath toys, and would benefit from an easy-access storage system. Better yet, an easy-access storage system that drains automatically. Well, you’ve come to the right place.

DIY Bath Toy Organizer

Photo of DIY bath toy organizer

This set up is great! Your little one can reach all of his/her toys, and putting them away after bath time is both easy, and fun! To make this organizer, you will need a few things.

Gather Supplies

  • 1 – tension shower rod (you can get this at any home improvement store)
  • 4 – (or your preferred quantity) plastic baskets with holes in them (you can find these at dollar stores)
  • 2 – per basket – S type shower hooks (metal is recommended for ease of use)

Do you have your supplies? Great! Now it’s time to put our new idea together!

Make It!

  1. Size your rod so that it fits roughly 6″ above the side of your tub along the back wall, and install.
  2. Install the shower hooks onto the tension shower rod.
  3. Decide where your baskets will be placed, and fasten to the rod by using the hooks with the holes in the baskets.

Easy, right? See? You CAN Do It Yourself!

Use It!

You know what to do! If you have toys that can be categorized, have fun placing categories in their own bins. Toss the toys home in a round of bath-time hoops with your little one. The best part? The holes in the bins mean that these cubbies are self-draining.

Like this project? See other projects in our DIY series. click here!

Build A Decorative Mug Plaque!

Coffee-Mug-Holder

This post is inspired by: http://bit.ly/14gUuQ1

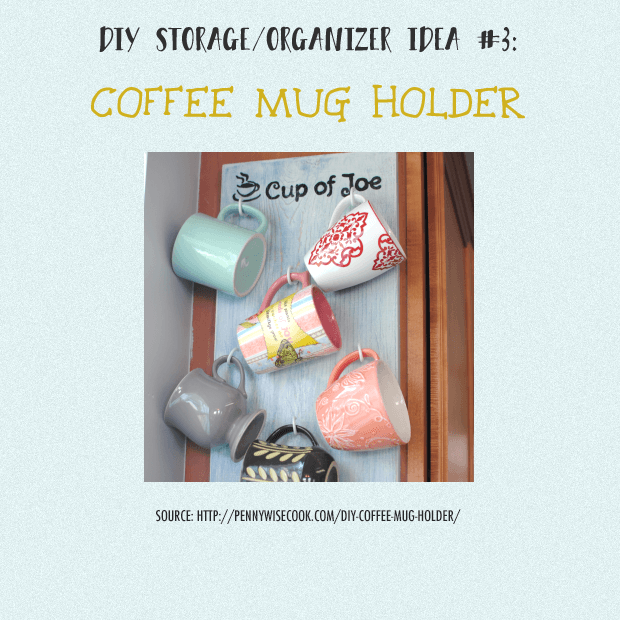
If you rely on a cup of coffee or tea in the morning, you probably don’t keep it a secret. Let’s turn your favorite dish in the cupboard (the noble mug) into a centerpiece of pride! Have you ever wanted to show off your stunning collection of unique mugs? Do you have a handmade favorite, or souvenirs from special memories, or simply a mug that makes a statement? Show it off!

DIY Mug Hanging Wall Board

This is something that every coffee lover will appreciate. If you are a tea-lover, this is for you too. This is quick, easy, and, not to mention, quite useful!

Gather Materials

For this project, you will need

  • A wood panel that is 1″ thick, 2′ wide, and as tall as you want. (as long as it will fit where you want to mount it)
    You can cut this yourself (be careful, and follow manufacture instructions on tools!), or have your home improvement center cut it for you. Remember to measure twice, and cut once. 
  • Some paint, stain+finish, or a finishing oil. (I like Danish Oil, as it gives color and protection in one product)
  • Lastly, you will need screw hooks large enough to accept your mug handles.

You can find all of these materials at your local home improvement store.

Build It!

FOLLOW INSTRUCTIONS ON PRODUCT CONTAINER(S)!

For Paint

Take your board, and paint it the color of your choice. If you want to distress it a little, paint a different color for two coats, and lightly spot-sand for a rustic color-reveal look.

Stain+Finish

If you are using a stain, lightly sand the board, wipe any dust free, and apply your stain in a well-ventilated area. Apply as many coats as product instructions indicate, and follow instructions for drying time. Once try, apply INTERIOR wood finish according to product instructions.

Finishing Oil

Apply finishing oil following instructions on product container. Certain oils may be buffed for added sheen.

Install Hooks

Once your board has dried, it’s time to install your screw hooks! Lay your board flat, and arrange mugs on it in a pattern that makes you happy. Mark where the hooks will be screwed. It may help to drill pilot holds before screwing your hooks in place. Screw hooks in place.

Mount Your Mug Plaque

If you are mounting this to the side of your cabinet, you can use 3/4″ wood screws to screw into it from inside the cabinet for a clean look, free of exposed fasteners. If you are mounting it anywhere else, use drywall anchors, or screw directly into studs using 2″ wood screws. Make sure your anchors are rated for the weight of the board + mugs.

Use It!

Now that it’s up, hang your mugs, and show your collection off with pride! The next time you stumble into the kitchen to pour your cup of coffee/tea, you will love being greeted by your mug plaque. Your guests will love it too!

Bonus Ideas

  • Using paint, stencil, or any other ideas you may find, paint a word, scene, or picture on your board!
  • Paint your hooks to match your kitchen decor!
  • If hanging directly on an exposed wall, add a row of hooks to the bottom for keys, kitchen tools, towels, or anything else you can think of!
  • Add a small shelf to the top (if you are handy enough) for more ornate detail and functionality!

Like this project? See other projects in our DIY series. click here!

Build A Stylish Dog Food Station

Dog-Food-Storage

While this may be a project for big dogs, you can certainly adapt the concept to fit your own adorable fur ball! This dog food station nests the food and water bowls into the top, so there is no chance of them being knocked around, or knocked over. Are you tired of cleaning the mess? This plan is for you!

DIY Dog Food Storage and Feeding Station

This is a carpentry project. If you do not already have a few carpentry tools on hand, you may need to improvise. The finished piece is approximately 28.5″ wide, 13.75″ tall, and 20.5″ deep. If you don’t have enough space for something this size, you might see this as simply inspiration for your own idea.

Gather and Cut

Tools

  • Table Saw (or Circular Saw)
  • Pocket hole jig (the pocket screws act as clamps, and you can use brad nails with bar or pipe clamps instead)
  • Drill/Driver
  • Phillips screwdriver
  • Jig saw (for bowl openings in lid. You can probably also use a router, or even a rotary tool with router attachment)
  • Power sander (will certainly make the job go faster, but you can also use a sanding block)
  • Chisel set

Materials

  • 1 – sheet .75″ veneer plywood (maple, birch, etc.)
  • 3 – of 1″ x 3″ x 8′ pine boards
  • 1 – .75″ square poplar dowel (6′)
  • 1 – .75″ square poplar dowel (4′)
  • 1.25″ pocket screws
  • 1.25″ brad nails
  • Wood glue (we recommend water-resistant, food-safe glue, like TightBond III or Gorilla Wood Glue)
  • Stain (not required if you wish to only use paint).
    I recommend a finish like Danish oil, which imparts both color and protection. You can also stain, then finish with melted paraffin wax applied with a foam applicator brush. Once dried, scrape off the excess with a putty knife or card scraper for a food-safe (even for knives) finish.
  • Paint (not required if you wish to only use stain/finish)
  • 2 hinges + 1 lid support hinge
  • Wood filler or spackling (optional)

Cut List

  • 1 – .75″ plywood – 24″ x 16″
  • 2 – .75″ plywood – 17.5″ x 13″
  • 2 – .75″ plywood – 24″ x 13″
  • 1 – .75″ plywood – 27″ x 19″
  • 4 – 1″x3″ boards – 17.5″ (cut to fit)
  • 4 – 1″x3″ boards – 27″ (cut to fit)
  • 8 – 1″x3″ boards – 8″ (cut to fit)
  • 2 – .75″ square dowels cut at 45deg, 28.5″ on the long side (cut to fit)
  • 2 – .75″ square dowels cut at 45deg, 20.5″ on the long side (cut to fit)

Build It

First

  • Drill .75″ pocket holes into each short side of the front and back panels (24″ x 13″ plywood pieces)
  • Drill .75″ pocket holes into each long side of the bottom panel (24″ x 16″ plywood piece)
  • Glue and screw the front and back panels to the bottom panel.

The screws provide the clamping pressure. If you don’t have a pocket hole jig, you can use an extra square dowel (24″ long) in the inside corners of the joint, then glue the contact sides and fasten both panels to it with brad nails, then clamp.

Second

  • Glue and attach the side panels (17.5″ x 13″ plywood pieces) with 1.25″ pocket screws.

The screws provide the clamping pressure. If you don’t have a pocket hole jig, you can use an extra square dowel (16″ long) in the inside corners of the joint, then glue the contact sides and fasten both panels to it with brad nails, then clamp.

Third

  • Measure the true width of the sides, and cut your 1″x3″ pieces to fit the top and bottom widths of the side panels. Glue and attach with brad nails.
  • Measure the true heights along the sides of the side panels between the trim boards you’ve just attached, and cut your 1″x3″ pieces to fit. Glue and attach with brad nails.

Fourth

  • Measure the final width of the top and bottom edges of the front and back of the box (length should include the 1×3 trim boards that you have attached), and cut more 1″x3″ lengths to fit. Glue and attach with brad nails.
  • Measure the true heights along the sides of the front and back panels between the top and bottom trim boards you’ve just attached, and cut your 1″x3″ pieces to fit. Glue and attach with brad nails.

Fifth

  • Measure the outer diameter (excluding lip) of your dog food bowls, draw the circles on the lid (27″ x 19″ plywood panel) accounting for equal space between them and the edges of the panel.
  • Cut the .75″ square dowel pieces to size. Glue and attach them to the edges of your lid with brad nails.
Tip: you can find the center of your not-yet-drawn circles, and tap a nail in place. Tie a string to it, measure the length to the radius (half the diameter) and mark the length on your string. Using a pencil, use your new “compass” to draw a perfect circle.

Sixth

  • If you are painting the box, you can fill in any gaps or holes with wood filler and/or drywall spackling.
  • Sand all surfaces of the box and the lid.
  • Paint and/or stain your surfaces, and allow time to fully cure. (read instructions on container for dry/cure times)

Seventh

  • Attach the lid to the box using the hinges of your choice, and the lid support hinge. (it’s a good idea to drill tiny pilot holes for your hinge screws)
  • Place the 10 gallon storage tub inside, and fill with dog food, and snap its lid in place.
  • Drop the food and water bowls that you measured into the holes that you cut into the lid. (they should be supported by their respective lips)
Tip: If your hinges mount to the inside of the hinged joint (hidden), it’s a good idea to chisel out enough of the back panel for the hinge to nest in so that the lid will close flush. After chiseling, sand, and paint/stain the newly exposed area.
Tip: You can measure, then build small open boxes to attach to the lid under your dog bowls to prevent any spills from entering the main storage bin.
Paint the inside of these open boxes to repel moisture.

Use It!

Your new self-made wooden dog feeding and storage station looks great! No longer will your dog’s food and water bowls slide around on the floor as they dine. No longer will you have to make extra steps to refill the food bowl!

Alt Use

This project makes a box that is quite sturdy.

Have kids? Build this without the holes in the lid for use as a toy chest!

Decorative storage? Add a cushion to the top for a stylish storage bench! You can use this in a mud room, or in a guest room to store linens pillows, and blankets.

Use your imagination!

Like this project? See other projects in our DIY series. click here!

Make Your Own Decorative Key Holder!

Framed-Key-Holder

Do you love whimsical decorations? What about decorations that are also useful?

If you have ever misplaced your keys, you may have tried to assign a place for them. The plan, anyway, is to always know where they are (at least when you’re home). Did it work?

The best way to actually benefit from your new organization tool is to encourage yourself to use it.

You will address this problem in two ways.
1: You will LOVE the way it looks, and you will actually WANT to hang your keys.
2: You will make this new key holder YOURSELF. Who doesn’t love to take pride in using their own creations?


[bctt tweet=”The best way to actually benefit from an organization tool is to encourage yourself to use it.”]


GATHER SUPPLIES

For this project, you will need:

  1. A frame.
    Sure, you can use almost any wood (or plastic, composite) frame, though why not get creative? It’s easy to find vintage or upcycled frames in antique stores, or online. Find one you like!
  2. A screw driver.
  3. Screw hooks.

BUILD IT

Prepare the Frame

  1. Remove any glass and backing from your frame. We want your frame to be free of accessories.
  2. Plan out and mark where you would like your key hooks to be placed on your frame. Remember to space them appropriately for your specific keychain.

Make the Holder

  1. Drill appropriate sized pilot holes for your screw hooks.
  2. Screw in each hook, making sure to be aware of the angle (don’t forget what they’re for).

Hang the Holder

Find a space on a wall near your entry/exit path, and hang your hanger!

USE IT

With any good organization tool, it doesn’t work unless you use it. You have set yourself up for success by choosing a great location, making your key holder yourself, and using a frame that you love. Great job!

ALT USE

Can you think of other ways to use your new creation?

Like this project? See other projects in our DIY series. click here!